How to create MP3 or WAV files on a Yamaha Clavinova CVP605/609 CVP705/709
A previous article called “Recording: The ‘Selfie’ of Music” focused on the benefits of making a midi recording on your Clavinova. As MIDI files are actually capturing data of performances rather than sound, everything about these recordings can be edited for a wonderful end result. (more on this in another article).

As a MIDI file is only data of a performance and not sound, when you want to share your music with others, the result isn’t always so pleasant. MIDI recordings are made up of musical data, and use your instrument’s internal sounds to play back your performance. When this performance is played back on a computer for example, the listener is hearing the performance played by the computers sound card, which never sounds as great as your CVP Clavinova!
Sharing your music via MP3 or WAV files is the best way to share your music with others, as these audio formats record the sound of your CVP performance. In addition, recording audio files will allow you to add your voice to your recorded performance if you’re a singer. Audio files are used for playback on CD players, devices, tape players, and even phonograph records. Creating audio files used to be a very expensive project, requiring a recording studio, microphones, etc, but now it can all be done from your CVP Clavinova!
![]()

An important point to know about audio recording on a Clavinova is that you have one pass to complete the recording, unlike a MIDI recording where you can multi track up to 16 channels. Of course you can record an audio file as many times as you need to, but you can’t multi-track audio files. If you want to do a multi-track recording, record it as a MIDI file first, and we’ll cover how to convert the file into an audio file in this article.
The CVP Clavinova has multiple audio formats, and it’s important to decide which format you want to record in first. WAV files are the highest definition audio files, and will create CD quality performances for listening. As these files are large, they are difficult to email as an attachment unless using a service such as Dropbox to share your music. The CVP Clavinova also has 5 resolutions of MP3 formats available for audio recording from 64kbps to 320kbps. The higher the number, the better resolution. For emailing purposes, best result for MP3’s is 128kbps or 256kbps. In default mode, the CVP Clavinova sets up audio files to be WAV.
To change the audio recording format
- Touch the Menu icon in the display
- Go to the second page of the Menu by touching the arrow in the right of the display
- Touch the Song Setting Icon in the display
- Touch Rec in the display
- Touch the down arrow in the lower right of the display
- Next to Audio Rec Format, you will see which resolution is currently set up. Touch the display where you see this (WAV or MP3), and a drop down menu will appear
- Touch the screen to select your chosen format
- Touch Close
To record your audio file
- Insert a USB flash drive into the Clavinova, as audio files cannot be recorded unless a USB has been inserted
- Set up the Clavinova for your performance, including a microphone if you are going to record vocals
- Press the REC button in the Song Control area
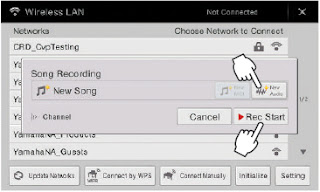
- From the display, touch the New Audio icon
![]()
The New Audio & Rec Start icons - Press Rec Start in the display
- Start playing your music
- When you are done with your performance, press Stop in the Song Control area on the control panel
- Your audio file will automatically be saved to the USB flash drive
- In the Song area of the display, you will see the title that the Clavinova assigned to the file such as “New Song 01” with an audio icon above it
- To rename the file, touch the Song area in the display
- Touch the File icon in the lower left of the display
- Use the Check Box in the display to select the song you wish to title
- Touch on the icon that looks like a pencil with the letter A
- Hold down the Delete button in the display to remove the current title
- Use the keyboard in the display to name your performance
- Touch OK in the display when finished
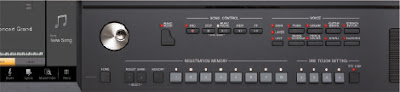 |
| The Song Control area with REC, STOP, and PLAY/PAUSE buttons |
Converting MIDI files to Audio
- Insert USB Flash drive into the Clavinova, as audio files cannot be recorded unless a USB has been inserted
- In the Song area of the display, select the MIDI file you wish to convert. You can also add vocal to a MIDI file, have your microphone plugged in and ready to go
- Touch the File icon in the lower left of the display
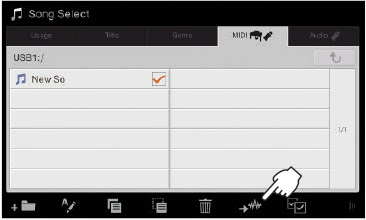
- In the display you will see the song you have selected has a check mark next to it. If this is not the file you wish to convert, uncheck it, and the check the song you want to convert
- Touch the icon in the display for audio – it looks like a squiggly line with a right arrow next to it
![]()
The audio icon looks like a squiggly line with a right arrow - Touch Convert in the display
- Your midi file will automatically start to play, this is how the conversion is done
- While the song is playing, you can add a vocal part over the top, or even play along
- Once the MIDI file has finished playing, the Clavinova will stop automatically and convert the file to audio on the flash drive
- The title will be the same as the MIDI file
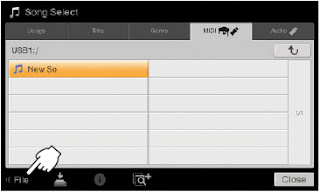 |
| File icon is in the lower left of the display |
To find your audio files on your flash drive
- From the Home Screen, touch the Song area of the display, and select the tab at the top of the display that says Audio
- Touch the USB1 icon and there you will see your audio files listed with the audio icon before the title
- Once you have selected the song file you want to hear, just press Play/Pause in the Song Control area of the control panel
Have fun with your personal audio recording studio right in your CVP Clavinova! You can share your recording with us on SoundCloud, YouTube, Instagram, Twitter, or via a link in the comments!
Lori Frazer
Yamaha Consultant
Keyboard Division
Keyboard Division