Quantcast
Channel: Yamaha MusicSoft Blog: Yamaha Keyboard and Disklavier News
Viewing all 144 articles
Browse latest View live

Newest Premium Voice Pack for Tyros5 – South East Europe

$
0
0

Yamaha MusicSoft is proud to announce the latest premium voice pack for the Tyros5 Arranger Workstation!

The South East Europe pack includes a huge variation of styles and voices from Romania, Slovakia and Hungary - perfect to play traditional and modern music. Explore the vivid spirit of Cymbalom-driven Romanian Folk and the magic of Hungarian Csardas, Gypsy Swing and Slovakian rhythms!
As a composer, I’m constantly listening for new ideas. Whether it be a new style to write in or new sounds for musical inspiration, my first stop is the Yamaha MusicSoft library.

This pack includes a whopping 40 Styles, 64 Voices, 15 Multipads and 80 registrations to add to your sonic palette.

I encourage you to explore all of the different expansion packs that are available. Some new found instrumentation may be all that your next great composition needs!

Check out the demos of this new pack and let us know what you think by leaving a comment below.

Is music part of your 4th of July?

$
0
0
 Yamaha Disklavier 4th of July

Because we live music-centric lifestyles here at Yamaha MusicSoft, music is a natural part of the holiday season. However, we realize that is not necessarily the case for everyone else. So, we’d like to hear from you to see if and how music is a part of your 4th of July?

I’ve spent that last few years attending a 4th of July celebration in my local community park. During the day they have bands playing a mix of classic rock, summer-themed songs and patriotic music. The fireworks display at night is usually accompanied by patriotic music in a variety of genres culminating with a big fanfare during the grand finale. It tends to bring up a mixture of emotions with memories of summers past and a look to the future.

If you are looking for some musical inspiration for your holiday gathering, check out the Yamaha MusicSoft website for 4th of July-themed titles. Or, if you own a Yamaha keyboard, Clavinova or Disklavier that you can connect directly to the internet, we suggest you check out the “Songs of America” channel on our Piano Radioservice. One of these may be the perfect music solution to accompany your holiday party!

Chord Tracker - Amazing app that analyzes your music and shows you the chords!

$
0
0
Have you ever tried to figure out what the chords are to your favorite songs? Well, search no further because now Yamaha’s new Chord Tracker app does the hard work for you!

The Yamaha Chord Tracker app for the iPhone/iPod touch/iPad helps you practice and perform songs by analyzing the audio of any song stored on you iOS device and displaying the chord symbols for you.

As a performer, it is great to have a tool like this to help me transcribe new songs where the sheet music isn’t available. Or, if I’m having a hard time hearing the “quality” of the chord (major, minor, 7ths, etc.), Chord Tracker helps me solve the mystery chords.

We had Mike, from our marketing team, give Chord Tracker a test drive using music from our Custom Audio Backing Tracks:


Once the song is analyzed, you can change the tempo or key of the song. You can even edit the chords to make your own arrangement of the song by choosing from two recommended chords or selecting the chord root and chord type.

Download Chord Tracker for FREE on the iTunes App Store, try it out and let us know what you think by leaving a comment below.

Tom Ring
Yamaha MusicSoft Product Specialist

New Printable Sheet Music Titles Available at Yamaha MusicSoft

$
0
0
Last week, Yamaha MusicSoft released 200 new titles of Printable Sheet Music!  Every genre and ability level is included in this release.  Instantly customize and print your favorite songs with the convenience of sheet music at your fingertips.

Here are just a few of our latest releases.

Megan Trainor

Blake Shelton

The Grateful Dead

Dear Future Husband
Sangria
Truckin'


Printing sheet music from Yamaha is as easy as 1-2-3.  Click here for a simple tutorial on downloading the correct software, purchasing sheet music, and printing your songs.

If you're looking for a title and can't find it, leave a comment below with your favorite.

Jaws movie theme – 40th Anniversary Tribute on the Yamaha Disklavier

$
0
0
For those of you that remember when “Jaws” first hit the theater it was one of the most terrifying and suspenseful films made to date! At the time of its original release, it was the highest-grossing film in history. 40 years later, it still holds up as a classic movie benchmark with an iconic theme song that still keeps people out of the water.

As a tribute, filmmaker Tony Desare put together this short film. The keys, chords and reverberations take on a thrilling life of their own, but the piano playing itself isn’t some Hollywood film trick. Tony enlisted the musical stylings of Yamaha’s own Craig Knudsen for the Disklavier’s key animations. (The music was recorded using a Yamaha DC7XE3PRO Disklavier piano.)


Disklavier uses a fiber-optic sensing system that records a pianists performance, capturing minute details such as how fast the keys are pressed and even released. This is what allows the Disklavier to reproduce something like “Jaws,” which includes a variety of key motions. Here is another wonderful example of how Yamaha’s Disklavier technology can entertain and inspire!

You can create an exciting piano performance in your own home without touching a key. YamahaMusicSoft.com has an exciting collection of PianoSoft songs that you can download for your Disklavier. Whether it’s to scare your goldfish or enjoy music while you host a party, a library of songs on your Disklavier is essential to take advantage of the instrument’s capabilities.

Have you checked out the Jaws video or used a Disklavier for your own dramatic purposes? Let us know in the comments.

The Top 10 hits for expanding your musical horizons!

$
0
0
Welcome to YamahaMusicSoft.com!

We say “welcome” because we want to welcome you to our site if you are a first-time visitor and welcome you back if you are a returning user. We’ve put together a “Top 10” list of categories to browse on our site.

We’ve had some feedback from users that while some of our products sound interesting, they’re not exactly sure how to use them. This blog post will be the first in a series that explains how the Yamaha MusicSoft product line can help make you a better musician or performer.

We’ve also received comments from several people that do not current own a Yamaha instrument and wonder, “Is there anything here for me?” The answer is a resounding – YES! We have several products including MIDI Songs, easy piano learning series like Playground Sessions, printable sheet music and more.

So what is Yamaha MusicSoft? Yamaha MusicSoft is the official digital music software store for Yamaha. We sell a variety of products that interface with instruments. There is a lot of information on our site so we want to break it down by the most popular categories:

1) Premium MIDI Songs– Thousands of MIDI songs that you can load into your Yamaha instrument or any other instrument/computer that supports the playback of MIDI files

2) Custom Audio Backing Tracks– Make your own digital mixes of “sound-a-like” songs from your favorite artists and sing or play along

3) Playground Sessions– Easy online piano learning system – Play your favorite song in 30 days or less!

4) Printable sheet music– Customize and print sheet music from your computer!

5) “You Are The Artist”– Play along with the hits with this exciting series of books and companion MIDI songs

6) PianoSoft– Listen to your favorite piano performances on your Yamaha Disklavier, keyboard or digital piano

7) PianoRadio– Over 25 channels of streaming radio on-demand in a wide variety of musical styles

8) Expansion Packs– Premium expansion libraries for your Yamaha Arranger Workstation or Motif synth

9) DTX Drums– Expansion libraries for Yamaha’s award-winning electronic drum kits

10) Traditional sheet music– Individual songs and songbooks shipped to your door

If you have any recommendations for additions to the site, we encourage you to leave your feedback below. We’d love to hear your tips for using instrument downloads to take your music to the next level.

Stay tuned to future blog posts for tips on how to use each of the categories!

Thanks for stopping by!
  
The Yamaha Musicsoft Team

What Makes You A Better Musician?

$
0
0
We recently asked this same question on social media, and were fascinated with some of the answers.  There were plenty of mentions of listening, listening, and more listening.  Some mentioned knowing music theory, while others relied on relentless amounts of practice.  A reply to this question on Twitter elicited a fascinating response: "dedication patience humility listening learning seeking refining individuality acceptance longing suffering sadness joy fear"

Of course, there is no one correct way.  But there are many paths to becoming better, and we at Yamaha MusicSoft enjoy hearing these success stories.  It's pretty well documented that some famous musicians do not know how to read music.

What do you think?  What makes you a better musician?

Recording: The “Selfie” of Music

$
0
0

(How to record on a Clavinova with 1 button)


In this age of individuals chronicling every moment of their day by posting pictures of themselves, it does make one wonder why we don’t do the same with music. Recording a quick tune that you’ve practiced, or even better – composed - can satisfy the need to archive a happy moment just as much as posting what you had for dinner. We do it with pictures, video, and social media - why not music?

Maybe we’ve forgotten just how easy it is, especially on the Clavinova. Since its inception, and through all its changes, the Clavinova has always maintained the ability to record your performance with the press of one button. (“Performance” may be a bit intimidating. Let’s call it a moment of inspiration – mistakes and all.) This means that just like taking a picture, you can create that musical “selfie” to share with your friends and family with the push of a button, giving them a melodic snapshot of your life.


When you’re ready to capture that moment, it works just like any other device – you simply press the record button. The Clavinova will wait until you play your first note, then record everything after that point until you press stop.


But this is where the Clavinova has a big advantage over other recording devices: What you just created is a MIDI recording, not an audio recording. How is it different? MIDI recordings are made up of musical data, and essentially use your instrument’s internal sounds to play back your performance. It’s as if your instrument remembers exactly what you just performed and repeats it back to you, including not only the notes you played, but the pedal movements as well, and even the buttons you press on the panel. So if you are pressing tempo buttons or changing instrument sounds during the recording, the Clavinova will remember those changes and repeat them during playback.

You can also change other aspects of the recording after the fact, including tempo and key. It’s just like picking your filter and adjusting your contrast or brightness in an image. You can record a piece at a slow tempo, and play it back at a faster tempo using the tempo buttons. You can also record in one key, and play it back in another using the transpose buttons. Again, things that aren’t as easy with just audio.
Creating a selfie on your Clavinova is easy
Creating a "selfie" on your Clavinova is easy!
That’s just the beginning of what you’re Clavinova can do with recording. Stay tuned for more features next month, and make that musical “selfie” today!

Share your musical “selfie” with us on SoundCloud, Twitter, Vine, or Instagram using the hashtag #ClavinovaSelfie. Then share this article to teach your friends how to record their own.

Jason Nyberg
Yamaha MusicSoft


8 Tips for Practicing Piano

$
0
0
Whether you’re just learning to play the piano or trying to master a piece by Chopin, practice is key. Here are our top 8 tips for practicing piano:

1) Set aside at least 20 minutes each day to practice
Practice, practice, practice! In order to truly master a piece of music there is no way around the practice mantra. Set aside at least 20 minutes each day to sit at the piano and practice your piece. That’s 20 minutes minimum – the more you can practice the better. If you do have more time try breaking your practice into 20 minute intervals throughout the day so it doesn’t feel too daunting.


2) Don’t forget to warm up
Have you ever tried to send a text message while your fingers were freezing? It’s nearly impossible to type quickly and without mistakes because your fingers are stiff. The same goes for playing the piano. It’s important to warm up your hands and fingers so you can fluidly play the keys. This is especially important when you are learning because you will stumble upon enough mistakes without clunky stiff fingers!

3) Don’t try to take on too much
Unless you’re a piano virtuoso, it’s highly unlikely that you will be able to master an arrangement the first time you play it. Instead of taking on the entire piece, break it down into manageable sections. Depending on your ability this can range from just one measure to one page. Whatever you or your teacher decide is achievable for you, set your practice goal and stick to it.

4) Avoid the tendency to always start at the beginning
Starting at the very beginning isn’t always a good place to start. When you start at the beginning each time you sit down to practice, you only master the beginning before your allotted practice time is up. This means that you never give yourself time to tackle that difficult section and master it.

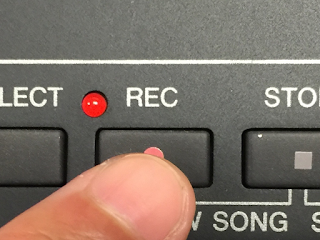
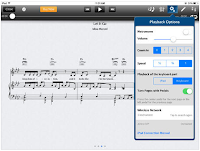
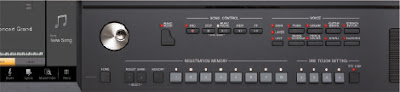
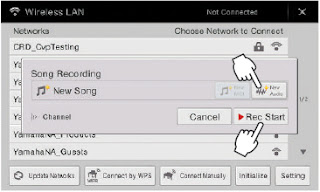
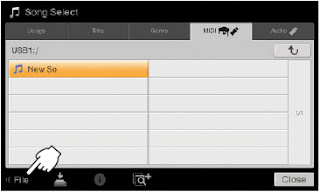
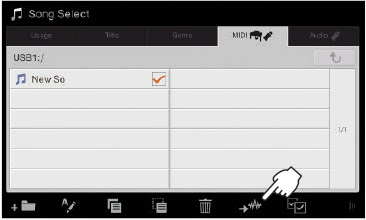
5) Practice slowly
Rushing through the piece means that you might make mistakes, and then you run the risk of learning those mistakes. Instead play each note deliberately until you are sure of your fingering. With the Yamaha Clavinova you can even record it at a practice tempo and play it back at a faster tempo to see how it will sound when you’ve mastered the piece. (Click here to learn how.)

6) You don’t need a piano to practice
While this advice might seem bizarre, you can practice piano key strokes absolutely anywhere. Practicing the fingering of a difficult section away from the piano can help your muscle memory when you do sit down to practice.

7) Listen to the song when you’re not playing
Knowing the tune of a song can often help your fingers move along the keys. Download the song you’re trying to master onto your MP3 player, and listen to it when you’re away from the piano. Having the song in your head can also get you excited to sit down at the piano and practice it yourself.

8) Pick a piece that you want to play
It may seem obvious, but you’re far more likely to practice a song that you like. You’re going to be playing the song over and over, so make sure it’s something that you want to hear! That’s where the Yamaha MusicSoft Printable Sheet Music library can help. It’s filled with thousands of songs, so you’re guaranteed to find something you like. And with our Printable Sheet Music you can instantly customize and print your choice of sheet music at home, so if you want to transpose the key or change the notation you can do that before you print.

Armed with a song you want to play, utilize these practice tips to become a better musician!

Let us know your favorite practicing tips in the comments.

How to Access More Sounds on Your Disklaiver

$
0
0

(Did you know you can make it sound like a choir?!)


While the Disklavier is known for its amazing playback capability, you may not be aware that it can actually produce other sounds as well. It’s almost like turning your piano into a synthesizer and instantly having a whole new level of musical creativity.

For example, why just play piano, when you could simultaneously play piano and strings at the same time? Or sound like a choir, trumpet, or even a timpani drum? 

The Mark III, Mark IV, E3, and pianos with a DKC-850 box can take advantage of this feature, because they all have additional sounds built right into the unit.

A combination I like to use a lot is combining the live acoustic sound with an electronic piano sound. Remembering my high school days brings back memories of this sound, which dominated the pop music scene. Often called the “David Foster” sound, it was used in the 80’s by Chicago in such hits as “Hard To Say I’m Sorry,” where Foster layered the traditional ballad piano with the shimmery bells of an electronic piano. It was yet another way the electronic music would forever change the sound of popular music.

Back to the piano and strings combination – this is a great setting for a lot of music, from classical Mozart pieces to modern music. Film scores often feature piano and strings, so dig through some of those theme songs and you’ll see it works for a wide range of material. The “Godfather” theme, “Harry Potter,” and everything in between are great candidates for this combination of sounds. 

If your Disklavier has the ability to silence the acoustic piano altogether, you can even have more fun featuring the other instrument sounds all by themselves. With well over a hundred sounds, there’s no shortage of options. One of my favorites is the choir. People never cease to be impressed when they hear a group of singers coming out of piano. Plus, dial all the way to the end of the instrument list, and you may actually find some sound effects!

E3 model owners, if you haven’t had a chance to see this clip from the DVD, take a look at this for a quick 3+ minute tour of this feature and how to access it. 


What's your favorite Disklavier Voice? Let us know in the comments. 

What’s the Difference Between PianoSoft Products?

$
0
0

Plus, New PianoSoft Solo Collections from U2 and Mann & Weil!


With Yamaha PianoSoft you can listen to original recordings of your favorite piano performances on your Disklavier, keyboard, or digital piano. When these songs are played back on a Disklavier, PianoSoft physically plays the piano – moving the keys to reproduce the original performance. It’s just like having a professional pianist in your home!

There are 4 different types of PianoSoft products to customize your listening experience:

PianoSoft Solo: Collections of solo piano performances

PianoSoft Plus: Piano performances with fully orchestrated backing tracks

PianoSoft Plus Audio: Your Disklavier plays in sync with a CD of audio tracks, featuring live instruments and vocals

Smart PianoSoft: Choose a CD from your personal collection, and it will play with the Smart PianoSoft file

Learn more about these PianoSoft products for your Disklavier here.


New PianoSoft Releases


We frequently release new PianoSoft products for your Disklavier. Here’s a selection of the latest releases.

"The Best of U2"
This PianoSoft Solo collection features spans the greatest U2 songs with classic hits like “New Year’s Day” and more recent songs like “Walk On”. Learn more

"The Soul and Inspiration of Mann and Weil"
A PianoSoft Solo compilation of legendary songwriting team Barry Mann and Cynthia Weil’s classic hits including “You’ve Lost That Lovin’ Feeling” and “On Broadway”. Learn more 

There are also 9 new Smart PianoSoft releases:

Madonna - "Immaculate Collection"

Celine Dion - "These Are Special Times"

Vivaldi -  "The Four Seasons"

Barry Manilow - "Ultimate Manilow"

Steely Dan - "A Decade of Steely Dan"

Mamma Mia! - The Musical

Van Morrison - "The Best of Van Morrison"

Tom Petty & The Heartbreakers - Greatest Hits

Josh Groban – "Closer"


What's your favorite PianoSoft collection or product? Let us know in the comments!

School Is In - Make It Fun This Fall With Playground Sessions!

$
0
0
We can't believe it either - another year of school back in session!  If you happen to like our Facebook page, you've seen a numberof postsregarding the importance of music education.  From the young to the young at heart, there are positive benefits to learning and performing music.

Here's the best part.  It is easier and more affordable than ever before to learn any instrument. Online, offline, teacher-based, DVD's, and books are just a few ways to learn the instrument of your choice. Although there are a few hundred online lesson plans available, Yamaha MusicSoft recommends Playground Sessions.

Click the video to the right to hear Quincy Jones speak to the natural partnership between Playground Sessions and Yamaha and why we chose to work with them.

We aren't alone in our endorsement of Playground Sessions.  In their latest assessment of online piano tools, TopTenReviews gave Playground Sessions was awarded the Gold Award and labeled the best way to learn the piano online.  Read their review here to learn why Playground was so highly rated.


Playground Sessions is available in the Yamaha MusicSoft store.  If you have already tried it out, let us know what you think in the comments below.  

More easy ways to learn to play the piano!

$
0
0
As we mentioned in our post earlier this week, it is easier than ever to learn to play an instrument. Whether it is an online interactive learning system like Playground Sessions or using an app on your tablet like NoteStar for the iPad, learning has never been easier, faster or more fun.

Yamaha has a long history of teaching students. The Yamaha Music Education System has been around for over 50 years teaching students from all walks of life how to play different instruments.
But, did you know that Yamaha MusicSoft also has several different teaching systems available?
Here are a few examples:

Keyboard Encounters/Keyboard Encounters Kids
Re-create the Keyboard Encounters classroom experience for both adults and kids in your own home! Our learning tool uses backing MIDI tracks that are compatible with Keyboard Encounters lessons, and are the same ones used in the Keyboard Encounters classroom. These are a great confidence builder for students!

Here are the benefits of using the MIDI backing tracks:
  • It recreates the classroom environment
  • It facilitates a helpful practice session which leads to a better live performance
  • Immersing yourself in the process makes learning more enjoyable
Check out the current songs for Keyboard Encounters here

QuickPlay
QuickPlay QuickPlay was designed specifically for Yamaha Clavinova owners and can be used in a classroom environment or for a student to learn at home, at their own pace. Most Clavinova keyboards include lights that illuminate above each key to show you which key to play next and will wait for you so you can learn at your own speed. The companion books also teach you basic music theory to create a platform for further musical study. You can view the catalog of available songs here.

Playground Sessions A brand-new piano learning software that is fun for all ages. This system uses active learning, elements of gaming, and your favorite songs to make learning piano fun! (see the previous blog post for more details).

NoteStar Keyboard players –experience playing and singing your favorite songs with a real band. NoteStar is Yamaha’s digital sheet music application for the iPad that features hands-free, smooth-flowing, easy-to-read digital sheet music accompanied by realistic audio backing tracks with vocals. You can play along with the band (with or without vocals), explore “Lessons Collections", create custom mixes and more! Check out NoteStar here.

Follow Lights If you have a Yamaha keyboard with guide functions, this may be the easiest way to learn yet! Using the guide system built into the keyboard, you watch for the light to illuminate above the key and press that key! It will even show you the music notation for the song right on the display screen of your keyboard.

With this Follow Lights feature, you can learn at your own pace. And, the song will wait for you to select the next correct note before continuing to play.


While learning to play the melody, your keyboard will be playing a full backing track as accompaniment. Unlike traditional MIDI files, these special tracks are designed to compensate for your learning and will sound great at any tempo! Check out our Follow Lights catalog here.

As you can see, there are many different ways to learn! We encourage you to explore each one and find the best fit for you and your learning style.

Have questions? Please reach out to us through this blog.

How to Install Voice & Style Expansion Packs for your PSR-S Series Arranger Workstation Keyboard

$
0
0
Yamaha Voice & Style Expansion (VSE) packs allow you to expand your creative horizons by making your electronic keyboard sound like different instruments, or Voices, and adding new Styles, which allow you to have a full backing ensemble based on chords that you play.

You can easily install all elements of Voice & Style Expansion packs, including Multi Pads and Registration Banks, onto your PSR-S Series keyboard. This video will take you through the installation process. It’s also available in Spanish here.


It only takes a few minutes to install the Expansion pack, Multi Pad and Registration Bank. Here is the step-by-step Voice & Style Expansion pack installation process:

Download the file

  1. Download your VSE pack from YamahaMusicSoft.com or usa.yamaha.com
  2. Copy the file to a USB thumb drive

Voice & Style Expansion Pack Instrument Installation 

  1. Insert USB thumb drive to the USB to device port (This may be on the back of your keyboard)
  2. Begin the installation process by pressing the FUNCTION BUTTON at the bottom right corner of the display
  3. Press the J BUTTON to select “EXPANSION PACK INSTALLTION” 
  4. Locate and select the Expansion Pack you are trying to install 
  5. In the number selection under the screen press #6 DOWN ARROW to choose install
  6. Press the F BUTTON to select “OK”
  7. Select the F BUTTON again to re-confirm the selection is “OK”
  8. Allow a few minutes for the installation process to complete 
  9. Once installation is complete press the G BUTTON to confirm it is “OK” to restart the keyboard 

Multi Pad Installation 

  1. From the main screen press G BUTTON to select “MULTIPAD” to view the Multi Pad browser
  2. Press the RIGHT ARROW TAB to select “USB” tab 
  3. Select BUTTON next to folder labelled “MULTIPAD” (This button location may vary)
  4. In the number selection under the screen press #3 DOWN ARROW to select “COPY” 
  5. Press #6 DOWN ARROW to select “ALL”
  6. Press #7 DOWN ARROW to confirm the selection is “OK”
  7. Press LEFT ARROW TAB to select “USER” tab
  8. Press #4 DOWN ARROW to “PASTE” 
  9. The keyboard  will now copy the Multi Pad files from USB thumb drive to keyboard’s internal memory 

Registration Bank Installation 

  1. Main screen J BUTTON to select “REGISTRATION BANK” to view the Registration Bank browser
  2. Press the RIGHT ARROW TAB to select “USB” tab 
  3. Press BUTTON next to folder labelled “REGISTRATIONS” (This button location may vary)
  4. In the number selection under the screen press #3 DOWN ARROW to select “COPY” 
  5. Press #6 DOWN ARROW to select “ALL”
  6. Press #7 DOWN ARROW to confirm the selection is “OK”
  7. Press LEFT ARROW TAB to select “USER” tab
  8. Press #4 DOWN ARROW to “PASTE” 
  9. The keyboard  will now copy the Registration Bank files from USB thumb drive to keyboard’s internal memory 

YamahaMusicSoft.com offers a variety of regional, ethnic, and traditional Voices and Styles that can be installed to change the sounds from your PSR-Series Arranger Workstation keyboard. You can browse the catalog of available Voice & Style Expansion Packs here.

Have a question about your instrument or installation? Let us know in the comments or you can always contact our customer service team.

Introducing “Style Files" for your Yamaha Arranger Workstation

$
0
0
In keeping with our "how to" theme this week, we’d like to introduce you to Style Files for your Yamaha Arranger Workstation. Style Files are a great way to expand the capabilities of your instrument and give you additional features to practice or perform with. [All of the Yamaha Arranger Workstations (PSR-S Series, A2000 and Tyros) can be expanded with Style files.]

Yamaha has created many Style Files based on hit songs and popular music genres. These Files provide you with a virtual backing band to play along with. The Style File is triggered by the chords you play with your left hand allowing you to play the melody with your right hand. We have a wide selection available on Yamaha MusicSoft and more are being added every week. With these Style files, you’ll be sounding like a professional right away!

Once you’ve browsed our site and downloaded your favorite Style Files to a USB thumb drive, simply follow these 3-easy steps to get playing right away:

  1. Select a Style (either built in to your Arranger Workstation or loaded into your instrument via USB)
  2. Press one of the ONE TOUCH SETTING buttons on your instrument
  3. Play a chord on your instrument with your left hand (as soon as you play a chord, the selected Style starts)

It’s that easy!

We encourage you to check out the available Style Files on our site. Please let us know what you think and if you don’t see a particular Style listed, feel free to make a suggestion in the comment box below.

Additional related YouTube tutorials:


How to Record Your Own Performance on Your Disklavier

$
0
0
One of the great things about the Disklavier is that it can play back a piano performance including every key, note, and pedal movement. But you’re not limited to watching other people’s performances; you can record your own!

This video will show you how to record your own personal performance on your Disklavier E3, as well as what album to save it to, and how to change the song name. 


Recording really is as simple as hitting the record button. Here's a step by step breakdown: 

  1. Navigate to the album in which you want your recording saved. Quick tip: “My Album” contains no pre-loaded songs and is album 1.
  2. Press the RECORD BUTTON on the control unit. The PLAY BUTTON will begin flashing indicating that you are ready to record. Also the words “record” and “new song” will appear on the display.
  3. When you are ready to being recording your performance on your Disklavier press the PLAY BUTTON. 
  4. When you are done playing press the STOP BUTTON. The display will indicate that song is being stored.
  5. To hear your song played back press the PLAY BUTTON.  
  6. Disklavier automatically gives recording a name and number in MIDI file format.

The Disklavier record function has many uses. You could simply play back your performances for entertainment as with other PianoSoft or Piano Radio songs. Like a professional athlete who watches a play-by-play of a game to hone his or her skills, you can watch your piano performance noting exactly how you played each key, your timing, or when you used the pedals to improve your performance. You can even use it to create a duo performance with yourself by recording the first part and playing the second part live, just as pianist Lisa Yui suggests in this article for The Juilliard Journal

For more Disklavier support including tutorials, manuals, and set-up details, check out the Disklavier Education Network

What other ways to do you use the record function on your Disklavier? Any other functions you want to learn more about? Let us know in the comments. 

Recording Audio Files on your Clavinova

$
0
0

How to create MP3 or WAV files on a Yamaha Clavinova CVP605/609 CVP705/709


A previous article called “Recording: The ‘Selfie’ of Music” focused on the benefits of making a midi recording on your Clavinova. As MIDI files are actually capturing data of performances rather than sound, everything about these recordings can be edited for a wonderful end result. (more on this in another article).


As a MIDI file is only data of a performance and not sound, when you want to share your music with others, the result isn’t always so pleasant. MIDI recordings are made up of musical data, and use your instrument’s internal sounds to play back your performance. When this performance is played back on a computer for example, the listener is hearing the performance played by the computers sound card, which never sounds as great as your CVP Clavinova!

Sharing your music via MP3 or WAV files is the best way to share your music with others, as these audio formats record the sound of your CVP performance. In addition, recording audio files will allow you to add your voice to your recorded performance if you’re a singer. Audio files are used for playback on CD players, devices, tape players, and even phonograph records. Creating audio files used to be a very expensive project, requiring a recording studio, microphones, etc, but now it can all be done from your CVP Clavinova!

An important point to know about audio recording on a Clavinova is that you have one pass to complete the recording, unlike a MIDI recording where you can multi track up to 16 channels. Of course you can record an audio file as many times as you need to, but you can’t multi-track audio files.  If you want to do a multi-track recording, record it as a MIDI file first, and we’ll cover how to convert the file into an audio file in this article.

The CVP Clavinova has multiple audio formats, and it’s important to decide which format you want to record in first. WAV files are the highest definition audio files, and will create CD quality performances for listening. As these files are large, they are difficult to email as an attachment unless using a service such as Dropbox to share your music. The CVP Clavinova also has 5 resolutions of MP3 formats available for audio recording from 64kbps to 320kbps. The higher the number, the better resolution. For emailing purposes, best result for MP3’s is 128kbps or 256kbps. In default mode, the CVP Clavinova sets up audio files to be WAV. 


To change the audio recording format

  1. Touch the Menu icon in the display
  2. Go to the second page of the Menu by touching the arrow in the right of the display
  3. Touch the Song Setting Icon in the display
  4. Touch Rec in the display
  5. Touch the down arrow in the lower right of the display
  6. Next to Audio Rec Format, you will see which resolution is currently set up. Touch the display where you see this (WAV or MP3), and a drop down menu will appear
  7. Touch the screen to select your chosen format
  8. Touch Close


To record your audio file

  1. Insert a USB flash drive into the Clavinova, as audio files cannot be recorded unless a USB has been inserted 
  2. Set up the Clavinova for your performance, including a microphone if you are going to record vocals
  3. The Song Control area with REC, STOP, and PLAY/PAUSE buttons
  4. Press the REC  button in the Song Control area 
  5. From the display, touch the New Audio icon
    The New Audio & Rec Start icons
  6. Press Rec Start in the display
  7. Start playing your music
  8. When you are done with your performance, press Stop  in the Song Control area on the control panel
  9. Your audio file will automatically be saved to the USB flash drive 
  10. In the Song area of the display, you will see the title that the Clavinova assigned to the file such as “New Song 01” with an audio icon above it
  11. To rename the file, touch the Song area in the display
  12. Touch the File icon in the lower left of the display
  13. Use the Check Box in the display to select the song you wish to title
  14. Touch on the icon that looks like a pencil with the letter A
  15. Hold down the Delete button in the display to remove the current title
  16. Use the keyboard in the display to name your performance
  17. Touch OK in the display when finished


Converting MIDI files to Audio

  1. Insert USB Flash drive into the Clavinova, as audio files cannot be recorded unless a USB has been inserted 
  2. In the Song area of the display, select the MIDI file you wish to convert. You can also add vocal to a MIDI file, have your microphone plugged in and ready to go
  3. Touch the File icon in the lower left of the display
  4. File icon is in the lower left of the display
  5. In the display you will see the song you have selected has a check mark next to it. If this is not the file you wish to convert, uncheck it, and the check the song you want to convert
  6. Touch the icon in the display for audio – it looks like a squiggly line with a right arrow next to it
    The audio icon looks like a squiggly line with a right arrow
  7. Touch Convert in the display
  8. Your midi file will automatically start to play, this is how the conversion is done 
  9. While the song is playing, you can add a vocal part over the top, or even play along
  10. Once the MIDI file has finished playing, the Clavinova will stop automatically and convert the file to audio on the flash drive
  11. The title will be the same as the MIDI file


To find your audio files on your flash drive

  1. From the Home Screen, touch the Song area of the display, and select the tab at the top of the display that says Audio 
  2. Touch the USB1 icon and there you will see your audio files listed with the audio icon before the title
  3. Once you have selected the song file you want to hear, just press Play/Pause in the Song Control area of the control panel

Have fun with your personal audio recording studio right in your CVP Clavinova! You can share your recording with us on SoundCloud, YouTube, Instagram, Twitter, or via a link in the comments!

Lori Frazer
Yamaha Consultant
Keyboard Division

What is the difference between Styles & MIDI songs?

$
0
0
In an on-going effort to respond to user questions, we’d like to talk today about the difference between “Styles” and “MIDI songs” available on the yamahamusicsoft.com website. First we must redefine “what” Styles and MIDI songs are and then we can explain the difference between the two.

Q. What, exactly, is a Style file?


A. Styles are found in the Accompaniment section of your keyboard, and can make you instantly sound like a one-man band! Just play a chord with your left hand, and you’ll hear drums, bass, guitars, and more all playing along to the same chord. Yamaha keyboards feature a variety of styles to play along with, from rock and pop to jazz and country. “Style Files” are at the heart of those exciting accompaniment patterns. 

A Style Files contains music (MIDI data) and system parameters that are played by the Style Engine. All Yamaha keyboards featuring Styles have a Style Engine built into their software. It smoothly and seamlessly recognizes and follows chord progressions played on the keyboard, then instantaneously plays the selected Style File to sound the correct chord and instruments to provide an interactive accompaniment to the melody you are playing with your right hand.


Q. What, exactly, is a MIDI song?

A. Yamaha designs Premium MIDI songs specifically to function with the learning features of Yamaha MIDI keyboard instruments. Unlike a basic “General MIDI file” you may find on the Internet, each MIDI song is optimized with additional features to work with the score, tempo and transpose features of Yamaha instruments, as well as the lesson features such as "follow the lights" and "song waiting". You can make custom mixes of MIDI songs on compatible Yamaha keyboards using the mixer feature and mute the instrument parts that you want to play on your keyboard!

These are only a few examples of the power and additional features a Yamaha Premium MIDI song provides.


Check out the latest Premium MIDI songs here:
http://www.yamahamusicsoft.com/dy/category/MIDI+Files/catalog

Q. How is a Style file different from a MIDI song file?

A. A Style file reacts in real time to chords you play on the keyboard, producing an accompaniment or 'backing band' for the music you are playing. A MIDI song file is linear and plays a specific song.
From a producing point of view, you would either be making an arrangement of a song or a sound alike, in both cases no original composition is required. When making a song you don't take care if it sounds good when transposed into different keys, whereas this is hugely important when making a style.

As a user, for MIDI songs you can turn tracks on and off, adjust the tempo and transpose keys, but you don't have any real control over the song, it just plays. With Styles, you are in control of what the band actually plays, leaving you free to sporadically repeat a chorus or create a new verse.

So there you have it. Hopefully this clears up any differences between the two and shows the unique characteristics and power of each type of file.

Please keep the questions coming! You can add a comment or question below.

See why everyone is talking about Playground Sessions

$
0
0
Why choose Playground Sessions to learn piano online?

There are many different online piano learning options out there. You can choose one-on-one instructions, or group lessons like those offered Yamaha Music Schools, or online lessons. In a previous blog post we even talked about some different ways you can learn or practice piano with Yamaha MusicSoft products at your own pace. 

The bottom line is that learning piano should be as fun as playing piano. We’ve had several customers share testimonials about why they love Playground Sessions, so we wanted to share them with you. 

Playground Sessions brings an online piano lesson to life with instant feedback. You'll see what notes you've played wrong and what you need to work on to improve your music. This makes it easy to identify which parts of the song you need to practice and which ones you already know well. 
Really brings the lesson alive. Helps you feel the music. The instant feedback you get is fabulous. Identifies the missed notes and allows you to practice specific measures that are difficult. Best designed self-teaching method I’ve seen.  Chuck Carrick, 71 years old
Playground Sessions turns learning piano into the perfect escape, so learning piano isn't a chore. You'll learn fundamental piano skills like reading notes, and counting rhythms while you play. And with points, badges, leader boards and ways to track your progress, it will all feel like a game. 
 I have really enjoyed using the Playground lessons. I like the aspect of it being almost a video game. It takes me away from all other things in the “real” world and gives me some real fun peace! - Steve Reis, 57 years old
Playground Sessions gives you a dedicated, inspirational teacher who breaks down each song in easy to follow tutorials. Your personal teacher, David Sides, is not only available 24/7, he is an extremely talented pianist with over 176 million views on YouTube. Watch his covers of "Apologize" by One Republic, "Halo" by Beyoncé, or "All Of Me" by John Legend if you ever need inspiration. 
I very much enjoy using Playground Sessions with the video tutorial. I am a very hands-on learner and ideally wanted a real life teacher but knew that financially and [with] time constraints that just wouldn’t work. Dave is a great teacher and really breaks the songs down and makes it easy to follow along.  Joshua Watts, 29 years old
Playground Sessions scores you on each song so you're inspired to practice until your song is perfect. With a library full of popular songs, it's easy to find favorites from Beyoncé, Michael Jackson, Beethoven, The Beatles and more. Plus, all songs come with audio backing tracks, so you feel like a member of the band. 
I love being scored on each lesson, and seeing how well I’m doing. I like being able to play a song over and over until I get 100%.  Nyla, 62 years old


See for yourself what people are raving about, sign up for Playground Sessions today!


Artist Spotlight On: Burt Bacharach

$
0
0
This week we begin a new series spotlighting an artist from our website.

You may not know his name but you have heard his songs. Burt Bacharach (along with frequent songwriting partner Hal David) wrote some of the most memorable music of the late 60’s, 70’s and 80's that have now become classics in their own right. Hit songs such as, “Raindrops Keep Falling On My Head”, “Do You Know The Way To San Jose?”, “What The World Needs Now”, “Alfie” and “I Say A Little Prayer” were all in heavy rotation during the 70’s. At 87 years old, he continues to write new songs, record and perform worldwide!

Bacharach has written songs for and collaborated with a diverse group of musical artists over the years including: Dionne Warwick, The Beatles, Elvis Presley, Tom Jones and Elvis Costello.

He has proven to be one of the most popular artists on the Yamaha MusicSoft website. This week, a brand new sheet music title from one of his many classics was released. This song, “Alfie” (from the hit motion picture of the same name), has been covered by a veritable “who’s who” of artists including: Stevie Wonder, Cher, Sonny Rollins, Dionne Warwick and what I believe is the definitive version by 60’s British songstress Cilla Black.

And, for our Disklavier owners, we also have a brand new Burt Bacharach Smart PianoSoft collection here.

This unique collection allows you to sync your Disklavier to the original recording of the album so it can play along. Great for entertaining at parties!

These are only a few of the many titles we have on our website. Be sure to check out all of the Burt Bacharach titles here.

We hope you enjoyed this introduction (or re-introduction) to a songwriting legend. Please keep the questions and blog post topics coming!
Viewing all 144 articles
Browse latest View live